Cloud Video Replication
White Paper by Dean Drako, CEO of Eagle Eye Networks
The PDF version includes additional content; download for more on this subject.
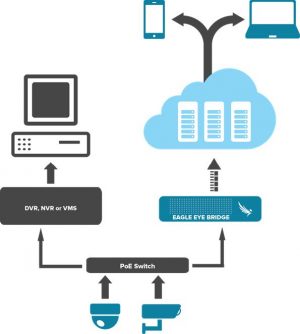
Cloud Video Replication is a way to access your video both on premise and in the cloud. There are multiple reasons why you may wish to do this including regulatory reasons, longer retention, or local video loss concerns. Whatever the reason may be, Eagle Eye Networks makes adding a Cloud Managed VMS to your deployment simple and easy.
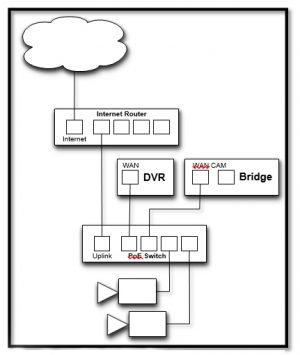
This document will explain two ways to set up Eagle Eye Cloud Video Replication but other configurations may be possible. Typically most settings on an Eagle Eye Bridge can be configured via the Eagle Eye web interface. However, for Cloud Video Replication, there are some cases where you will need to use the local console to make some network adjustments. A computer monitor and keyboard will need to be plugged into the Bridge in order to access the admin screen.


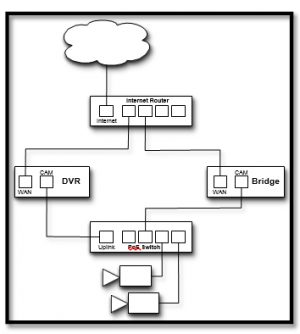
Figure 2, on the left illustrates the simplest way to set up Cloud Video Replication. In this example, all of the cameras are on the same switch and the 3rd party VMS and Eagle Eye Bridge are both independently connected to the internet. DHCP will need to be disabled on the CamLAN.

- Install the camera as you normally
- Adjust the camera settings just as you normally would do for the 3rd Party VMS as if there was no Cloud Video
- A second stream will need to be configured on the camera that will be the preview MJPEG stream for Eagle Eye. Setup the stream for 8 FPS and the compression you would like for the Eagle Eye
- Add the camera to the 3rd Party VMS. Use an h.264 codec stream from the camera for the Primary RTSP stream. You will add this same stream URL to the Eagle Eye system as the “Full Video” stream after verifying the camera is streaming properly with the 3rd Party
- Enable “RTSP” for the account with the bridge you will add the camera Here is a link to an article on how to add cameras via RTSP:
- Click the yellow “+” at the top right of “available cameras” to add a camera via
- Fill out the information for the camera. You will need to know the static IP of the camera and the stream For Full Video, use the same stream that you used when adding it to the 3rd Party VMS.
You will access your Eagle Eye Networks deployment as if it was running alone. If you run into any issues or have any questions, please contact Eagle Eye Networks at +1-512-473-0501 or email [email protected]


